
Apologia
This is the project log for my barbed hierodule kitbash/conversion/bodging. It’s mostly intended as an aid to my memory, but may prove mildly helpful or interesting to other complete novices. I can’t promise to be of help, but, if you have any questions, feel free to email me.
Click any of the images below for more pictures and information.
Inspiration
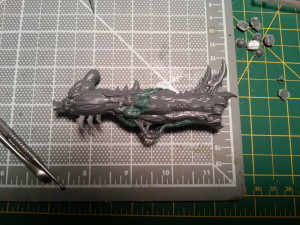
When I was gifted with an exocrine/haruspex boxed set, I clipped everything out in preparation for figuring out how to magnetize the thing, so that I could swap between the two critters at will. Whilst idly staring at the pieces, it struck me that the exocrine cannon might mate nicely with the beefy foreleg, if one were to perform a bit of judicious trimming and greenstuffing.
So, as a test, I snipped off the toes, and started slapping greenstuff into place. If this turned out reasonably well, I could do a matching one for the left forearm as well, and I’d have a nice set of ludicrously oversized bio-cannons for something fun.
After a bit of time spent swearing over my lack of greenstuff skillz, I had to say that things look promising.
Let’s make a hierodule!
I’ve been mildly lusting after a barbed hierodule from Forge World for a while now; however, why spend a bunch of money to buy one, when I could just as easily spend twice as much money and ten times the labor on a good kitbash? How hard could it be to make one of these?
So, it was time to start prototyping. (“Prototyping” is a fancy term meaning “sticking random bits of plastic together with poster tack to see how they look”.)
First, I tried to come up with a suitably imposing scything talon, as I was working under the assumption that I should try to come as close as possible to the official model. While I was not unhappy with the result (an abominable hacking-together of multiple scything talons and a fleshborer hive), I decided that a different aesthetic would be better. Why not go quadrupedal?
It’s worth noting, however, that a simpler kitbash using the stock exocrine body and tail; a spare exocrine cannon; tervigon legs; some monstrous scything talons; and something creative for the head would likely result in a perfectly reasonable proxy, and would be far easier and cheaper than my attempt.
Four legs good, two legs bad
For the four-legged concept, I grabbed a set of toxicrene/maleceptor front legs. Even though they weren’t scything talons, I figured big claws would be close enough, especially with one limb raised to strike. The overall proportions aren’t right yet, but it’s getting closer.
Face time
For the head, I knew that I wanted something big, blocky, and armored…and toothy, of course. Recognizably tyranidish, but not a carbon copy of the Forge World hierodule.
I went with a couple of carnifex carapace plates for the brow and neck plates, some miscellanous mawloc mouth parts for the teeth, random spikes, and some lumps of poster tack where I though features might eventually go. Came out okay, so we’ll call that a plan.
Four legs good, two legs bad, but these legs suck regardless
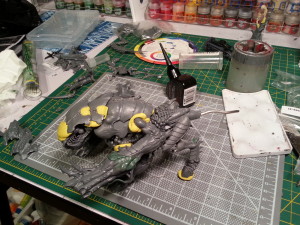
Okay, I’m indecisive. As things progressed, I was just not feeling the toxicrene legs. So, why not try slapping on another pair of muscular, glistening, indomitable exocrine legs instead?
They made positioning of the other limbs a bit trickier, but I liked the gunbeast solidity of the firmly planted legs.
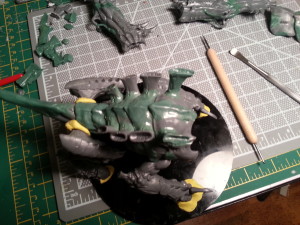
You can also see the armature for the tail extension, and the craptastic temporary join of the tervigon legs to the rear “hips”.
And yes, the tail is attached upside down. I knew I’d be heavily modifying it anyway, and flipping it upside down brought the whole angle up a good bit, rather than the droopy-bottomed stock exocrine body.
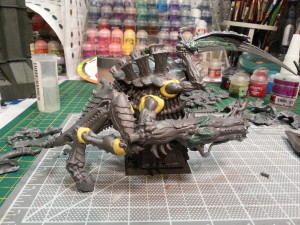
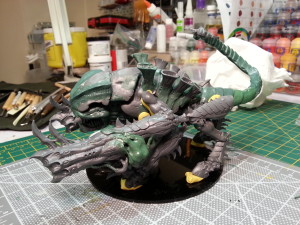
Now we’re getting somewhere

Here’s where I start getting excited…no more prototyping and temporary flailing for me! Now, my flailing will be far less easy to correct!
In this phase, I started seeing things coming together. The head and neck assembly began to look like they were going to work, and the roughing out of the carapace really started to make it look like it did in my head. I did realize that the tail was going to be a big pain in the posterior…lots of work in store to sculpt all the plates I’ll need.
I need to vent
I had used the six exocrine vents for the hierodule, but it looked like he was two too short. After rummaging through my bits box, I realized that I didn’t have any more spare vents that were of roughly the correct size, so I got creative…I went to HobbyTitan.com to order some. (What, do I seem like the kind of guy who insists on taking the harder path for everything? You don’t have to answer that, given the project I’m currently showing off…)
Sadly, HobbyTitan was out of stock on every vent I could find, and I didn’t feel like spending hours scouring eBay. Then I remembered that I’d bought some reusable instant mold…the kind where you heat it in boiling water for a few minutes, then press your master into the soft goop and wait a few minutes for it to cool. I put together a really clumsy two-part mold of tervigon central vents (my thumbprint was used in a couple of places to act as a key, if that gives you an idea of the lack of concern for tolerances), and pressed a couple sets. Once they had fully set, I glued them in place with the others, and spent some time smoothing small bits of green stuff around all eight bases.
In hindsight, I wish I’d cast the vents out of Apoxie Sculpt, as it is far more rigid than greenstuff when it dries. No biggie, though.
In the end, good advice is worth its’ weight in biomass
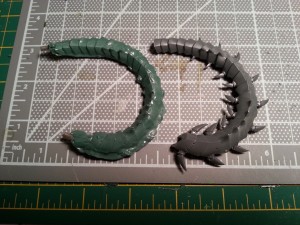
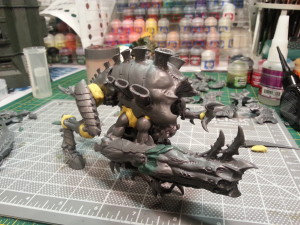
Per an excellent suggestion from @glitchrr36 on The Tyranid Hive, I decided to make use of a trygon tail as the basis for that of the hierodule. That seemed likely to eliminate untold hours of misery, and would probably result in a nicer aesthetic than the stiff Forge World-ish tail I had planned.
Of course, I didn’t want the dramatic flat curve of the stock tail, and was a bit wary of heating and bending the plastic. So, I figured I’d make use of the insta-mold again, and make a mold of the top of the trygon tail. I could then cast it in greenstuff, with an armature wire core, so I should be able to bend it to a pretty significant degree, and not have to mold all those top plates myself.
Worked out pretty well…the wire was close enough to the surface that it showed through in a couple of spots when bending, but that’s easy enough to conceal. A carnifex tail biomorph tops it off nicely.
This makes two components of the conversion that relied on my son’s Legos to some degree…perhaps I should thank him by showing mercy the next time my ‘nids treat his orks like a Chinese buffet.
Getting further ahead
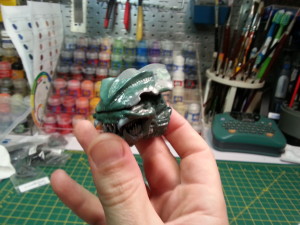
I’ll have to apologize for the quality of some of the pictures…taking camera phone pictures in one hand, whilst clutching one’s freshly greenstuffed objet d’art in the other, leads to shaky pix and lack of focus.
That aside, I started fleshing out the head and neck a bit more. I added some pores and tendons and neck striations, as well as a big sweeping double crest on the frontal carapace plate.
I should really spend more time practicing the best way to create some of the common Tyranid bio-structures in green stuff, as everything I’ve done thus far has been right on the model…get it right or cover it up/cut it off later. In hindsight, this isn’t the best way to achieve good results, but I console myself by calling this whole beastie a practice piece. Heh.
Calgar, take me away!
(If you get the reference without Googling, congratulations! You’re old.)
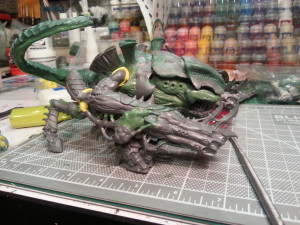
I decided to make sure I had a more-or-less finalized pose, before going any further. (That, and it always makes me grin to stick the pieces atop one another and see the beast come together.) Then, I figured I might as well throw in a model for perspective…
On the left gun, you can also see the ammo feed mechanism I added…when complete, there will be a tube connecting the pouch with the torso.
Back to basics
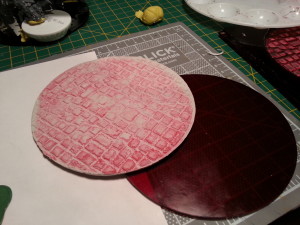
Now that the pose was more-or-less finalized, I felt it was time to start fleshing out the base. I knew I wanted something with some interesting texture, so decided that flagstones or cobblestones or something similar would be fun. Then, I thought about how little I really wanted to carve four or six dozen tiny blocks, and the merits of glue-and-flock started to loom large.
THEN, I remembered some experiments I’d been doing at my local TechShop, cutting and engraving plastic objective markers with the Trotec Speedy 300 laser cutter. Hmm, I hmmmed…I wonder if I could blatantly steal a picture of a stone floor from somewhere, and engrave it deeply enough into a piece of plastic that I could then use said plastic as a mold?
I grabbed a chunk of scrap 1/8″ thick acrylic, and started playing with images and settings. The Trotec cutter I was using defaults to engraving any black in the source image, so I found a random image of a manhole cover and converted it to black and white, then sent it to the Trotec. There, I experimented with the settings until I found some that resulted in a deep etch, without too much distortion and no cut-through. After a half-dozen runs with the manhole cover, I was ready for the stone floor.
Thirty seconds with Google produced a suitable image, which I then massaged it into a print size to fill the 5″ circle. Again, I cleaned it up (mostly just through manipulating contrast and brightness), converted it to a posterized black and white, then sent it to the Trotec. After only forgetting which settings to use twice, I ended up with a nice negative mold, plus a second layer with a 5″ hole to act as the walls of the mold.
Once the mold was glued together, I hit it with some mold release, then pressed in some Apoxie Sculpt. After letting it sit for a couple of hours, I carefully pried it out, then glued it to the cut-out disk of plastic from the top layer of the mold. Tah-dah, instant basis for base.
The next step was to add some form of wound counter, as well as a pedestal upon which Barbie could rest his poor tired right foreleg. For the wound counter, I magnetized a spore tower thingie, and carved a few numerals in the flagstones around it. I also added a second one, just starting to burst through the ground, so the first didn’t look so lonely.
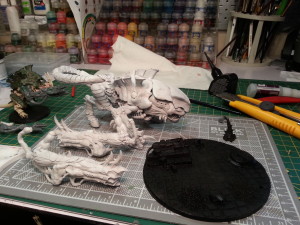
Inching closer to victory
It’s been a few days since the last update. Highlights:
– Head is mostly done, at least below eye level and from brow on up
– Tail has been bulked up a bit, although there’s still a lot of work to do to clean up the plates.
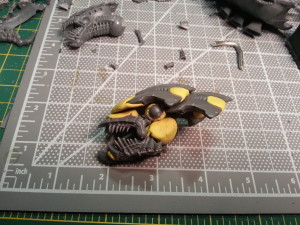
– Ammo sacs have been added to both cannons
– Miscellanous carapace and body work have been done
He’s getting close. The only remaining work before I can call it completely roughed-in is the eyes and the ammo sac feed tubes. The tubes should be pretty trivial; the eyes, well, I dunno. They’re the one area of this beast where I’m really not seeing it in my mind’s eye, so I’ve been postponing them a bit.
Time to paint
I’ve spent enough time fiddling and filing and sanding and tweaking. Is it even close to “good enough”? HELL no. Is it at the point of “I need to move forward, rather than bog myself down indefinitely?” HELL yeah.
So, I busted out Ye Olde Airebrushe, slapped on some grey primer, and laid down a light basecoat on the carapace, skin, and fleshy bits. This lets me check for super-obvious problems like mold lines and unsanded blended edges and whatnot (not that I’m going to fix them), as well as block out where the brush is gonna hit.
I really enjoyed the modeling, but it’s so nice to see it with some color. Hopefully, will be table-ready by the weekend.
Vaguely table-ready
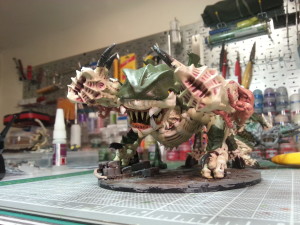
Woo-hoo, I broke out the glue!
The paint is far enough along that it’s worth glueing the cannon-arms in place. Sure, there’s all sorts of flaws, and the paint has a long way to go, but I’m just as pleased as punch with how it stands so far.
Resources
Green Stuff, aka Kneadatite: I used a lot of this. Easy to work, holds detail (like, for example, fingerprints 🙁 ) astonishingly well, and can be readily acquired online or at your FLGS. When dry, remains a bit flexible. Get the bars, not the tape, as you’ll end up having to cut away the center strip of the tape anyway.
Apoxie Sculpt: like greenstuff, a two-part epoxy putty. Seems a bit softer and stickier than the greenstuff when damp, but ends up more rigid when dry.
The Converting/Terrain board on The Tyranid Hive: Lots of good advice and knowledgeable people here.
Green Stuff Industries: tools and tutorials for the eponymous wonder material.